HP HX2000 Series Back Up Battery ... - iPAQ Repair and Parts
HP HX2000 Series Back Up Battery ... - iPAQ Repair and Parts
HP HX2000 Series Back Up Battery ... - iPAQ Repair and Parts

You also want an ePaper? Increase the reach of your titles
YUMPU automatically turns print PDFs into web optimized ePapers that Google loves.
Introduction<br />
<strong>HP</strong> <strong>HX2000</strong> <strong>Series</strong> <strong>Back</strong> <strong>Up</strong> <strong>Battery</strong> Replacement Guide<br />
By Nathan Dickman<br />
http://www.ipaqrepair.co.uk<br />
This guide aims to provide some assistance <strong>and</strong> tips for a DIY replacement of the back up battery for the<br />
hx2000 series <strong>iPAQ</strong> (hx2110 / hx2115 / hx2410 / hx2415 / hx2750 / hx2755 / hx2790 / hx2795).<br />
A faulty back up battery is often to blame for a wide range of <strong>iPAQ</strong> memory issues such as the loss of all<br />
data <strong>and</strong> custom settings when the unit’s power runs down, a replacement back up battery will cure your<br />
unit of its temporary amnesia.<br />
Required Tools<br />
• A Torx size 6 (T6) Screwdriver (available here in the tools section of the website, suitable for all<br />
models).<br />
• A new back up battery for the hx2000 (available here).<br />
• A small crosshead screwdriver.<br />
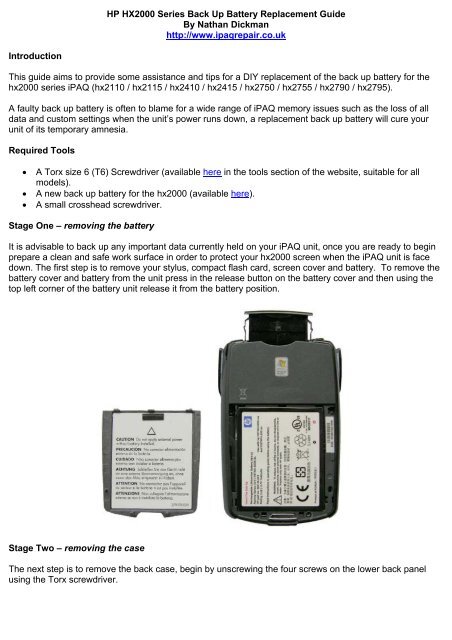
Stage One – removing the battery<br />
It is advisable to back up any important data currently held on your <strong>iPAQ</strong> unit, once you are ready to begin<br />
prepare a clean <strong>and</strong> safe work surface in order to protect your hx2000 screen when the <strong>iPAQ</strong> unit is face<br />
down. The first step is to remove your stylus, compact flash card, screen cover <strong>and</strong> battery. To remove the<br />
battery cover <strong>and</strong> battery from the unit press in the release button on the battery cover <strong>and</strong> then using the<br />
top left corner of the battery unit release it from the battery position.<br />
Stage Two – removing the case<br />
The next step is to remove the back case, begin by unscrewing the four screws on the lower back panel<br />
using the Torx screwdriver.
Once you have removed these screws you can now take off the rubber grips on the side of the <strong>iPAQ</strong> –<br />
simply push the grips away from the unit <strong>and</strong> these should come away easily.<br />
With the rubber grips removed you can now unscrew the last two screws, located on both sides of the top<br />
case. Please be aware that opening your <strong>iPAQ</strong> unit will void your official <strong>HP</strong> warranty.
The case is now ready to come off, simply pull the front case away from the back case from the bottom of<br />
the unit.<br />
Step Three – disconnecting the mainboard<br />
To access the <strong>iPAQ</strong> back up battery you will need to remove the mainboard, this involves disconnecting a<br />
number of components (see picture)
The first step is to disconnect the cable connectors on the right h<strong>and</strong> side of the unit, these cables simply<br />
pull away from the socket.<br />
Disconnect the cable connectors on the left h<strong>and</strong> side of the unit also.
Disconnect the Screen cable by simply pulling the connector away from the socket.<br />
With these components disconnected you only need to unscrew the top two screws, after this the<br />
mainboard is ready to take away from the unit.
As the headphone socket (in the top left of the unit) also holds the unit into the case you will need to pull the<br />
mainboard downwards <strong>and</strong> away to release it from the front case. When removing the mainboard be aware<br />
that if your unit features the white WiFi cable you do not need to remove this in order to access the battery –<br />
it is long enough to allow you to replace the battery without disconnecting it.<br />
Step Four – replacing the backup battery<br />
You are now ready to replace the hx2000 backup battery; this is simply held in place by an adhesive glue<br />
spot. Remove the old battery, <strong>and</strong> fit the replacement in the same position using the adhesive spot.
Stage Five – unit reassembly<br />
With your new battery fitted you can now begin to reassemble your unit! Reposition the mainboard firstly by<br />
levering the headphone unit into the headphone socket <strong>and</strong> then laying it into position. Using Stage Three<br />
as a reference reconnect the three push connectors, screen cable <strong>and</strong> refit the two screws. Before you put<br />
the back case on be sure that there are no cables that may get snagged between the case assembly. Once<br />
you are sure that all components <strong>and</strong> cables are safely connected, affix the back case.<br />
You can now put the rubber side grips on the unit – be aware that the rubber grip with the Record Button is<br />
the left grip (as the screen faces you). With the battery <strong>and</strong> battery cover back on you have successfully<br />
completed this simple replacement! Now be sure to charge your unit fully (until the orange charge light is<br />
constant) <strong>and</strong> your hx2000 <strong>iPAQ</strong> is ready to use!<br />
The text <strong>and</strong> images are © Nathan Dickman if you wish to distribute or use this document in any<br />
way please contact me via the website located at:<br />
http://www.ipaqrepair.co.uk/contact_us.php<br />
Revision History<br />
14/03/2008 12:31