FinePix S9100/S9600 Quick start - Fujifilm USA
FinePix S9100/S9600 Quick start - Fujifilm USA
FinePix S9100/S9600 Quick start - Fujifilm USA

You also want an ePaper? Increase the reach of your titles
YUMPU automatically turns print PDFs into web optimized ePapers that Google loves.
Shutter<br />
button<br />
BL00559-200(1) E<br />
A. Loading the batteries<br />
1<br />
2<br />
B. Setting up the camera<br />
1 xD-Picture Card CF/Microdrive<br />
Gold<br />
contact<br />
area<br />
2<br />
Mode dial<br />
Gold marking<br />
Power switch<br />
Still photography<br />
Power-OFF<br />
Playback mode<br />
Photography mode<br />
<strong>S9100</strong>/ <strong>S9100</strong>/ <strong>S9600</strong> <strong>S9600</strong><br />
Flash button<br />
Continuous<br />
shooting button<br />
Command dial<br />
Manual Picture Stabilization<br />
Aperture-priority Auto Natural light<br />
Shutter-priority Auto Portrait<br />
Programmed Auto Landscape<br />
Auto Night<br />
Movie recording<br />
Movie<br />
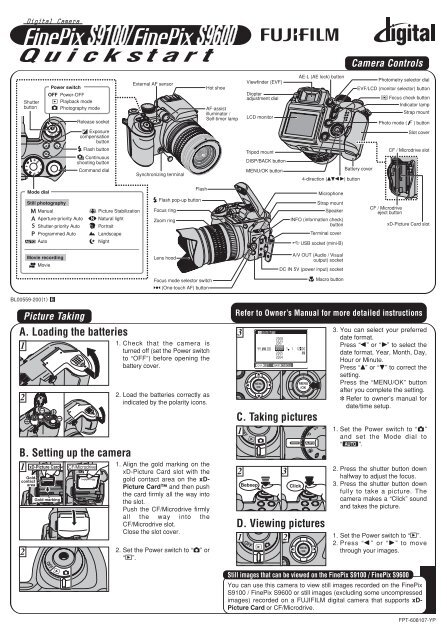
Picture Taking<br />
Release socket<br />
Exposure<br />
compensation<br />
button<br />
External AF sensor<br />
Synchronizing terminal<br />
Flash pop-up button<br />
Focus ring<br />
Zoom ring<br />
Lens hood<br />
Flash<br />
Focus mode selector switch<br />
(One-touch AF) button<br />
1. Check that the camera is<br />
turned off (set the Power switch<br />
to “OFF”) before opening the<br />
battery cover.<br />
2. Load the batteries correctly as<br />
indicated by the polarity icons.<br />
1. Align the gold marking on the<br />
xD-Picture Card slot with the<br />
gold contact area on the xD-<br />
Picture Card and then push<br />
the card firmly all the way into<br />
the slot.<br />
Push the CF/Microdrive firmly<br />
all the way into the<br />
CF/Microdrive slot.<br />
Close the slot cover.<br />
2. Set the Power switch to “q” or<br />
“w”.<br />
Hot shoe<br />
AF-assist<br />
illuminator /<br />
Self-timer lamp<br />
Viewfinder (EVF)<br />
Diopter<br />
adjustment dial<br />
LCD monitor<br />
Tripod mount<br />
DISP/BACK button<br />
MENU/OK button<br />
C. Taking pictures<br />
1<br />
AE-L (AE lock) button<br />
4-direction (abdc) button<br />
Microphone<br />
Strap mount<br />
Speaker<br />
INFO (information check)<br />
button<br />
Terminal cover<br />
USB socket (mini-B)<br />
A/V OUT (Audio / Visual<br />
output) socket<br />
DC IN 5V (power input) socket<br />
Macro button<br />
Camera Controls<br />
EVF/LCD (monitor selector) button<br />
Battery cover<br />
Photometry selector dial<br />
Focus check button<br />
Indicator lamp<br />
Strap mount<br />
Photo mode ( ) button<br />
CF / Microdrive<br />
eject button<br />
Slot cover<br />
CF / Microdrive slot<br />
xD-Picture Card slot<br />
Refer to Owner’s Manual for more detailed instructions<br />
3<br />
DATE/TIME<br />
DAT E / T I M E<br />
YY.MM.DD<br />
Y Y. M M . D D<br />
2 3<br />
2008<br />
2007<br />
2006<br />
2005<br />
2004<br />
1 1 12 00<br />
A M<br />
SET S E T CANCEL C A N C E L<br />
Bebeep Click<br />
3. You can select your preferred<br />
date format.<br />
Press “d” or “c” to select the<br />
date format, Year, Month, Day,<br />
Hour or Minute.<br />
Press “a” or “b” to correct the<br />
setting.<br />
Press the “MENU/OK” button<br />
after you complete the setting.<br />
✽ Refer to owner’s manual for<br />
date/time setup.<br />
1. Set the Power switch to “q”<br />
and set the Mode dial to<br />
“B”.<br />
2. Press the shutter button down<br />
halfway to adjust the focus.<br />
3. Press the shutter button down<br />
fully to take a picture. The<br />
camera makes a “Click” sound<br />
and takes the picture.<br />
D. Viewing pictures<br />
1 2<br />
1. Set the Power switch to “w”.<br />
2. Press “d ” or “c ” to move<br />
through your images.<br />
Still images that can be viewed on the <strong>FinePix</strong> <strong>S9100</strong> / <strong>FinePix</strong> <strong>S9600</strong><br />
You can use this camera to view still images recorded on the <strong>FinePix</strong><br />
<strong>S9100</strong> / <strong>FinePix</strong> <strong>S9600</strong> or still images (excluding some uncompressed<br />
images) recorded on a FUJIFILM digital camera that supports xD-<br />
Picture Card or CF/Microdrive.<br />
FPT-608107-YP
Viewing images on your PC<br />
A. Install Software<br />
Do not connect the camera to your PC until the software<br />
installation is completed.<br />
1. Turn on your PC and <strong>start</strong> up Windows.<br />
●! Users of Windows 2000 Professional or Windows XP should log in<br />
by using a system administrator account (e.g. “Administrator”).<br />
2. Quit all other active applications until no applications are<br />
shown in the taskbar.<br />
3. Load the enclosed CD-ROM into the CD-ROM drive. The<br />
installer <strong>start</strong>s up automatically.<br />
4. The Setup screen appears.<br />
Click the [Installing<br />
<strong>FinePix</strong>Viewer] button.<br />
5. After installation completed, press [Close] button.<br />
B. Connect the Camera to your PC<br />
1. Load a media containing photographed images into your<br />
camera.<br />
2. Set the Power switch to “w” to turn the camera on.<br />
Select “” DSC in “ò” USB MODE in the “˜” SET-UP<br />
menu (Refer to “USING THE SET-UP SCREEN” in the<br />
owner’s manual).<br />
1<br />
2<br />
3<br />
4<br />
: OK O K<br />
: SET S E T<br />
: SET S E T<br />
: ENGLISH<br />
E N G L I S H<br />
: SET S E T<br />
:<br />
DSC D S C<br />
3. Turn your camera off.<br />
4. If you have one, plug the AC power adapter connector into<br />
the “DC IN 5V” socket on the camera and then plug the<br />
adapter itself into the main power outlet, otherwise be sure<br />
your batteries are fresh and charged.<br />
5. Turn your PC on.<br />
6. Connect the camera to the PC using the USB cable (mini-B).<br />
7. Set the Power switch to “w”.<br />
A.Install Software<br />
B.Connect a Camera to PC<br />
C.Save Images<br />
Camera PC<br />
USB socket<br />
8. Windows 98 SE/Me/2000 Professional<br />
<strong>FinePix</strong>Viewer <strong>start</strong>s up automatically.<br />
Windows XP<br />
The “Found New Hardware” help message appears in the<br />
bottom-right corner of your screen. This message will close<br />
when the settings are completed. No action is required.<br />
<strong>FinePix</strong>Viewer <strong>start</strong>s up automatically.<br />
C. Save Images<br />
1. The Save Image Wizard <strong>start</strong>s up. Click the [Start] button.<br />
2. Check that the files are downloaded from the camera to your<br />
PC and that a folder with the date is created.<br />
Ex. \My Documents \ My Pictures \ 2006_0624<br />
D. View Images<br />
1. Click the [Show List of Images]<br />
button.<br />
2. Select “Preview” in the View menu to display an enlarged image.<br />
For more information<br />
Refer to “How to use <strong>FinePix</strong>Viewer” in the HELP menu, or chapter 5<br />
and 6 in the Owner’s Manual, or visit <strong>Fujifilm</strong> “Q&A Search” in the<br />
following website.<br />
( http://www.fujifilm.com/products/digital/ )<br />
For Macintosh users, refer to chapter 5 and 6 in the Owner’s Manual.