Shelterbelt design
- Download this page: Shelterbelt design (WORD - 267.3 KB)
- Download this page: Shelterbelt design (PDF - 260.5 KB)
The benefits of shelter to the farm enterprise have long been recognised and include protection of crops, livestock, reduced soil erosion, salinity control and biodiversity improvements.
There are many reasons to establish shelterbelts. What you want your shelterbelts to do determines the type of shelterbelt you should establish.
This note outlines the many aspects of design and location, which you should consider when planning your shelterbelt to ensure a successful and efficient result.
How shelterbelts work
Shelterbelts are vegetative barriers that are designed to reduce wind speed and provide sheltered areas on the leeward (the side away from the wind) and windward (the side toward the wind) sides of the shelterbelt.
As wind approaches the shelterbelt, some goes around the end of the shelterbelt, some goes through the shelterbelt and most goes over the top of the shelterbelt.
Air pressure builds up on the windward side and decreases on the leeward side. It is this difference in pressure that drives the shelter effect and determines how much reduction in wind speed occurs and how much turbulence is created.
The amount of air pressure difference is determined by the structure of the shelterbelt. The more dense the shelter, the greater the difference in air pressure.
The structure of a shelterbelt can be altered by modifying the:
- height
- density
- number of rows
- species composition
- spacing between the trees or shrubs.
Paying attention to your shelterbelt’s length, orientation and continuity will also improve its efficiency.
Design of a shelterbelt
The first step in designing a shelterbelt is to determine its function. What you want the shelterbelt to do determines the type of shelterbelt to plant. Shelterbelts can actually have a detrimental impact on farm productivity if they are not appropriately designed.
There are several key elements to effective shelterbelt design. The elements that need to be considered when designing a windbreak are height, length, density, location, number of rows and the species to be used.
It is important to maximise the height of a windbreak, as its height will determine the area over which the windbreak has a positive impact.
Using the tallest suitable shelter species in at least one row of the shelterbelt will increase the eventual area over which a windbreak is effective. The use of good quality plant species from a local provenance will help to achieve this. The species used for the taller row can be fast growing, to achieve maximum height quickly.
Longer windbreaks are more effective than short ones. Wind has a tendency to flow around the ends of a shelterbelt and increase turbulence at that point. To reduce overall turbulence it is wise to create a shelterbelt that is as long as possible. The length of a windbreak combined with its height determines the extent of the protected area.
For maximum efficiency the uninterrupted length of the windbreak should be at least 10 times its height.
Gaps within a windbreak reduce its effectiveness. Gaps can result in an increase in wind speed due to the wind accelerating as it funnels through the gap within the shelterbelt. This effect is often called wind tunneling.
Where gaps are necessary, for example a gateway, a small strip of shelter in front of the gap (Figure 1) or stagger rows to create and angled gap (Figure 2) can solve this problem.
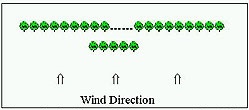
Figure 1: An island belt can prevent wind from tunneling through gaps within the shelterbelt.
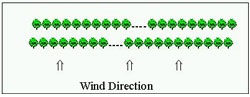
Figure 2: Angling the gap on a shelterbelt can prevent wind tunneling through gateways, etc.
Density
The desired density of a shelterbelt again depends upon the purpose of the shelterbelt. Density is the proportion of solid material, such as foliage, branches etc. within a windbreak. Density can affect the extent and level of shelter provided. Wind turbulence is generally reduced with lower degrees of density.
A high-density shelterbelt will provide a higher level of shelter over a shorter distance than a medium or low-density shelterbelt. Therefore very dense windbreaks may be used where a high level of shelter is required over a short distance.
A very dense windbreak forces wind to be pulled down on the leeward side creating turbulence. As the density of a shelterbelt is reduced, more air passes through the shelterbelt and reduces the amount of turbulence created by the dense windbreak. As a result the extent of the down-wind protected area increases.
When designing a shelterbelt you should aim for a medium density of around 40-60 per cent cover. You should also aim to have an even density from the ground level to the top.
If shelter is not provided to ground level wind will tunnel through the gaps at the bottom of the shelterbelt creating a zone of higher wind speed immediately to the lee of the shelterbelt. To achieve even density, a shelterbelt should be established using shrubs and groundcover species as well as taller species. Advice on suitable species can be obtained from your nearest Agriculture Victoria office.
Using species with dense foliage, having more rows - or spacing plants closer together - can increase windbreak density.
Row design
Multiple windbreak rows are less susceptible to the impacts of gaps and non-uniform growth and are more likely to achieve a greater overall height.
Single row species can be effective if they are established using a species that has a uniform foliage density from ground level to the top of the shelterbelt. One or two row shelterbelts can be effective and economical if they are well designed and use appropriate species. The effectiveness of these shelterbelts depends on high plant survival rates.
An effective windbreak design often consists of two to four rows using taller species that provide the benefits of a tall shelterbelt combined with shrub species that provide shelter lower down and therefore overall a more uniform density.
Shelterbelts of two to four rows can provide significant benefits while not requiring large areas of land to be removed from direct productivity purposes. It is important to select appropriate species for shelterbelts of one or two rows because they may be significantly less effective if the form of the species varies significantly.
Increasing the number of rows can provide different benefits but not more protection of land. Biodiversity aspects of a shelterbelt are increased by increasing the width of a shelterbelt. Tailoring the number of rows to the objective is the key to a successful shelterbelt.
Including a row of fast growing species can provide quicker benefits and also protect species that are slower to establish. This row can later be removed if desired.
A livestock haven can be created if shelterbelts are wide enough. Livestock can be moved into the vegetated area itself during spells of extreme weather conditions, but they will damage the haven and should generally be excluded.
Timber production can be incorporated into a multi-rowed shelterbelt. Timberbelts consist of a row or rows of timber species combined with lower growing shrub species.
Plant location and spacing within shelterbelts
Rows should be spaced between two to four metres apart to allow the plants to grow relatively unrestricted. There should be at least two metres between the first row of plants and the fence to prevent livestock from grazing on the plants.
Smaller trees and shrubs should be placed on the outer rows of a shelterbelt to prevent them from being shaded out by the taller species.
One aspect of design to keep in mind is the common misconception that a sloping cross-section profile enhances windbreak effectiveness. Steep sided shelterbelts shelter a larger area because they provide a greater height barrier to wind flow and a lower density on the windward side. Sloping profiles on the windward side can actually reduce the distance over which protection is provided.
Taller species should be placed in the centre of a shelterbelt. Lower growing species can be placed on each side. The cross sectional profile of a break that consists of shrub species on both sides is a more valuable design for wildlife habitat and is more practical. Large tree branches are less likely to fall on and damage fences if the trees are located in the centre of the shelterbelt.
Considerations when deciding spacings between plants should include the time taken for the plants to reach the desired density level and the size of the species selected. Medium to tall trees are usually spaced three to four metres apart. Large shrubs can be spaced between 2.5 to 4 metres while smaller growing shrubs are generally placed 1.5-2.5 metres apart.
Plants should be placed closer together in shelterbelts with fewer rows to obtain the desired level of density. This will also provide protection more quickly. Staggering trees in alternate rows can obtain more uniform density and a reduction in gaps so that they are not directly opposite each other.
Species Selection
The species selected for your shelterbelt should provide the height, growth rate and density characteristics suitable for the objectives of the shelterbelt.
Points for consideration when selecting plant species include:
- locally native species generally have higher survival and establishment rates
- locally native species provide valuable habitat for local wildlife species
- species that will grow tall on the site should be used for one or more rows. Noting the height and health of particular tree species in the area can identify these species
- species with an appropriate foliage density that complements the height and density of other selected species to obtain even and suitable density should also be used
- the growth rate of species should be taken into consideration. Where the effects of shelterbelts are required quickly, fast growing species can be used
- the use of species that regenerate naturally on the site may be useful where this is desirable
- having too many different species can reduce the uniformity of the shelterbelt. Generally people use one species per row or species with similar or compatible growth forms.
The use of species that provide timber for firewood, fence posts or commercial uses may be desired. Using a shelterbelt for timber production may require more specific management practices. Information on appropriate species and management can be obtained from your local agriculture services office.
Fodder species can be used in a shelterbelt to provide a food source. These plants can be grazed directly by livestock or cut and provided to livestock. Removing fodder from the shelterbelt can compromise its ability to provide shelter.
For information on plant species suitable to your area contact your local Landcare Group, Agriculture Victoria Extension Officer, or Catchment Management Authority.
Shelterbelt location
The location of shelterbelts will determine their level of effectiveness. Thought should be given to the location of a shelterbelt that will provide the maximum benefit for livestock, crops, pasture and wildlife.
The direction of prevailing and other winds and the location of livestock and crops that require protection are major deciding factors on the orientation of shelterbelts. Shelterbelts should be placed perpendicular to problem winds.

No single orientation of a shelterbelt will provide protection from all winds. Therefore several shelterbelt orientations will provide greater shelter (Figure 3).
A consideration for the siting of shelterbelts is the ability to move livestock into sheltered areas during adverse conditions. It can be difficult to move livestock in a direction that opposes the wind direction. This needs to be weighed up against potential reduction in protection if the shelterbelt is not perpendicular to the problem winds.
During summer shelterbelts can protect pasture and crops from moisture losses by reducing the impact of hot drying winds. Shelterbelts can also reduce erosion by wind during summer months when soils can be bare. Ideally shelterbelts should form a grid using north-south and east-west orientations. This will provide shade for livestock at different times of the day and protection from winds coming from all directions.
Alternatively, cornered windbreaks provide protection from winds that come from a range of directions. Therefore a windbreak established in a right angled corner protects a larger area from a range of wind directions.
Orientation of a shelterbelt can influence the amount of available shade, providing additional production and livestock health benefits.
Consideration should be given to orientation in situations where sunlight needs to be optimised such as along laneways or wet areas.Incorporating remnant vegetation in to shelterbelts can provide a cost-effective shelterbelt and enhance biodiversity values.
It also provides an opportunity to consider natural regeneration as an establishment method rather than actively planting. Another cost-effective option of establishing shelterbelts that can be consider is direct seeding.
Hillside plantings
Shelterbelts can generally be established at the mid-slopes on the contour of a hill or on the crest of a hill. Gullies on a hill are generally protected. Steeper and higher areas of the hill are generally more exposed to wind. Planting on the ridge of a hill provides extra height which in turn increases the area sheltered. Hill top plantings can protect areas that are prone to erosion and strong winds.
Plantings on the contour of a hill can trap air and create a localised frost zone unless precautions are taken. Establishing gaps within the shelterbelt or allowing the air to drain out at one end can reduce this effect. Alternatively reducing the density of the shelterbelt on a contour can reduce the effect also.
Establishment
It is very important to plan and prepare the site for a shelterbelt in advance. Thorough site preparation will ensure a shelterbelt gets off to a good start, reaches an ideal height and maximises its potential to achieve the objectives. In the longer-term less work is involved in establishing a shelterbelt on a site that has been well prepared.
Thorough weed control and ripping of a site into which tubestock is to be planted is vital. It is frequently said that the three most important factors involved in site preparation are weed control, weed control and weed control.
Weed removal should be undertaken well in advance of planting or direct seeding. This will allow moisture to be held within the soil rather than be used by weeds.
On some sites deep ripping of the site will also improve the water availability for tubestock plantings and should also be undertaken in advance. Ripping also promotes deep, strong root growth.
Mounding the site may be an important preparation technique for sites prone to waterlogging or cracking.
An integrated pest animal control program should be implemented prior to planting if required. Young trees are susceptible to grazing by rabbits and hares. Rabbit proof netting may be placed around the site to protect it from re-invasion following control works. Native species such as kangaroos and cockatoos may also damage young plants.
Livestock proof fencing should be constructed around the site prior to planting. Livestock can cause high levels of damage in a very short amount of time.
Advice on vegetation establishment and site preparation can be obtained from your local Landcare Group, Agriculture Victoria Extension Officer, or Catchment Management Authority.
Conclusion
There has been a large amount of research into the benefits, design and economics associated with shelterbelts. These studies have shown that correctly designed shelterbelts can provide a range of significant benefits to landholders.
Shelterbelts can contribute towards the creation of a more productive, sustainable and visually attractive farm. They also provide intrinsic values for wildlife and contribute to the overall landscape appearance of an area.
Further reading
On this site:
Australian Journal of Experimental Agriculture (2002) Special edition, Vol. 42, Number 6.
Bird, P.R. (2000) Farm Forestry in Southern Australia. Pastoral and Veterinary Institute Hamilton, Centre State Printing.
Bird, P.R., Kearney, G.A. and Jowett, D.W. (1994) Trees and Shrubs for South West Victoria. Pastoral and Veterinary Institute Hamilton. Osborn Mannett Pty. Ltd.
Design Principles for Farm Forestry - a guide to assist farmers to decide where to place trees and farm plantations on farms (RIRDC1997) Burke, S. (1998) Windbreaks. Inkata Press, Sydney.
Further information
For more information contact your local Agriculture Services Extension Officer or call the customer service centre on 136 186.
Acknowledgements
This document was originally developed as a Landcare note by Hayley Johnson and Dr James Brandle (USA), May 2006.
It was reviewed by Hayley Malloy, Farm Services Victoria. October 2009.
Updated March 2017.
It was reviewed and updated by Kylie Macreadie, Agriculture Services. June 2023.
ISSN 1329-833X